
7 Mistakes to Avoid When Rebuilding Your Engine
Did you just start your engine rebuild and your head already hurts? Or maybe you want to play it safe and learn as much as possible before you take on such an endeavor?
Engine building leaves very little room for error due to the precision work that is required. Most of the times there are no second chances, asking for forgiveness or hoping the mistake will go unnoticed. Making mistakes often leads to extra work or catastrophic failure where everything just ends up being a pile of scrap.
It could start with overheating due to a blown head gasket, or just the prolonged culmination of heat and friction. Whatever the case, doing an engine rebuild takes time, patience, a budget and a good, clean workspace.
Thankfully, information is out there and it can save you time, money and headaches. We have compiled the 7 mistakes that are made most often and will make your engine rebuilding life easier.
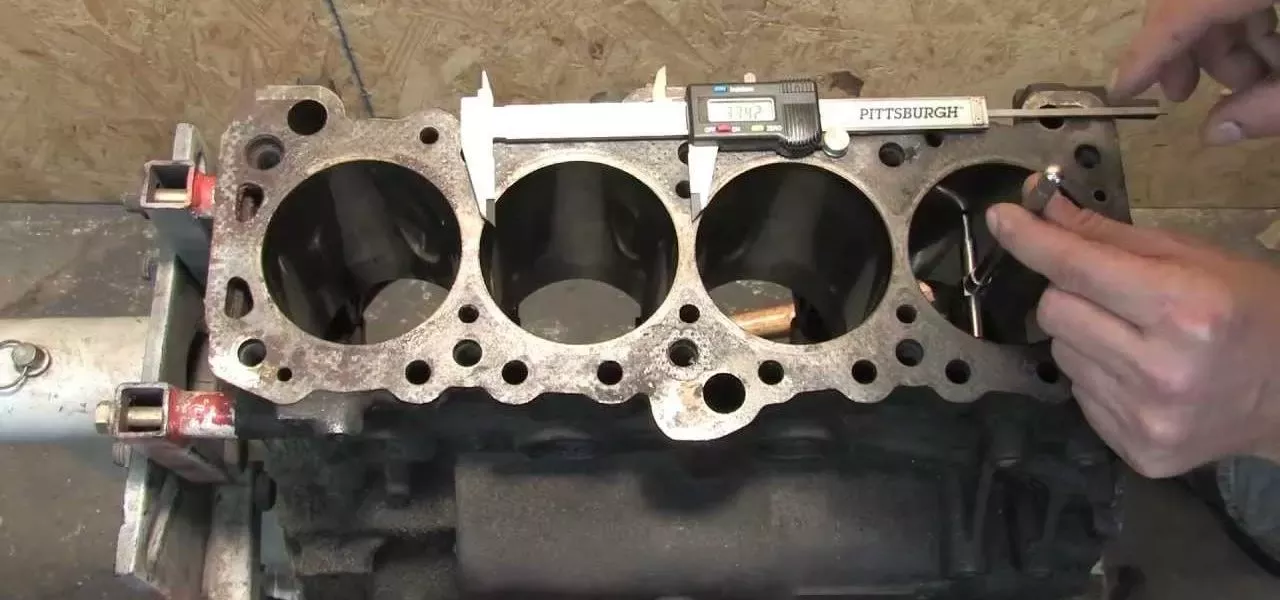
1. Not taking proper measurements...
As with any complex project, the core of the work lies in small details especially on an engine rebuild. Taking exact measurements is crucial for ensuring that at the end of the day, everything will come together and work seamlessly.
When it comes to measurements, everything must be measured with care and precision. This includes cylinders, crankshaft, bearing clearances, ring end gaps, etc. The proper way to do this is to first clean and check all components for cracks, defects and abnormal or excessive wear.
After these initial checks it's time to move forward and bring out various gauges and micrometers combined with patience. Patience as more than one measurement is necessary to double check the results. Why? Measurements need to be taken from more than one point or angle as presence of abnormal wear would significantly impact the results.
The outcome? You might find details about engine issues you did not know beforehand and also it will end up saving you money on your project. For example... cylinders, where a simple measurement will tell you if you need to rebore or deglaze (with a nice crosshatch pattern) and just fit new rings. The difference between the two being that the latter one is the cheapest.
Let us cover a few examples of proper measurements.
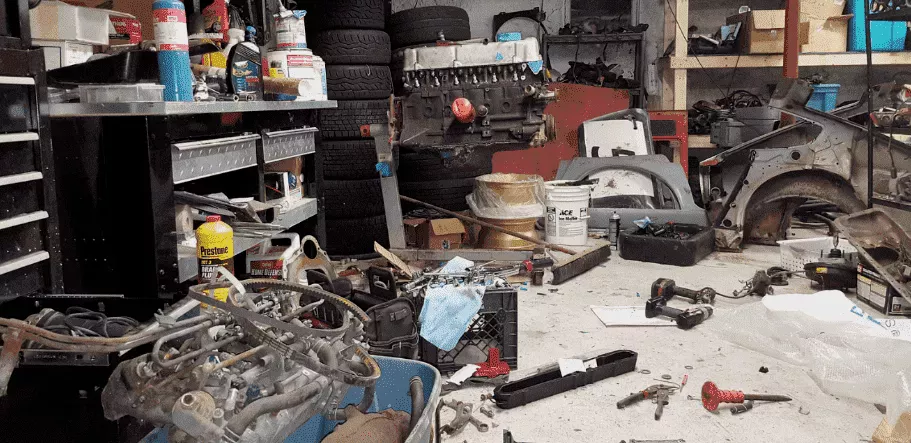
2. Not having a clean and organized environment.
Tools
Working on your car can create a mess, with piles of components, bits and pieces scattered all over the place.
This could make you more prone to wasting time searching for a component, tool or other part.
The more tools you have, the better mechanic you are...but where to put them all?
It's a good idea to organize your workspace following some basic safety guidelines. Guidelines such as devising special storage areas for each type of tool you use (power tools, compressors, keys, sockets, drivers, etc.). Then actually putting the tools back there when the task is done. You would be surprised how many mechanics do not get into this simple, yet time saving habit.
Thus you ensure that even small tools are not lost or worse forgotten in important places such as engine internals. Yikes!
Rolling carts or toolboxes are perfect for this job as they would keep everything in a single, mobile location.
Any corded tool that is no longer necessary should be unplugged and placed back to it's store area. There is a high risk of injury if the floor of the workspace is full of cables, sockets, drills and other debris.
Fluids
Another especially important aspect is related to fluids. Inevitably you will have some form of spillage. Perhaps engine oil, brake fluid or coolant. Whatever the case may be, it would be best to clean any such residue as soon as it appears. Having a quality floor dry on hand is critical to quick cleanups.
Forgetting about an oil puddle could turn out to be dangerous or expensive. Reason is that... in an eventual spreading, it could coat tools or other components that are not desired.
Depending on the type of floor and spillage, the end result could be very slippery and result in injury. As Murphy's law goes, this would probably happen during the transfer of something heavy.
Discipline is mandatory in order to stay safe, protect your investment and waste no time at all searching for tools. It is advisable to clean at the end of each day or project by eliminating the debris on the floor, placing all tools back to the correct location and checking for any missing parts. Quite simply, this makes life so much easier.
3. Not taking video when you should have while coming apart
Gone are those days when you would work night and day trying to put everything back together without ending up with that extra nut, bolt, washer, retainer, etc.
Life is easier on the technical side, with so many instantly available videos, articles and how to's. However, harder on the time side as there are so many tasks to do and so little time... so why take the hard path? Not to mention that newer engine builds have way lower tolerances versus older engines, leaving slim to no wiggle room for mistakes when doing an engine rebuild.
Video has proven to be useful when taking apart complex elements or big projects that stretch out in time. Reason is that we can accurately remember only so much and with the army of screws, covers, fasteners, cables, connectors and gaskets nowadays... it's easier than ever to get overwhelmed and forget something.
Not to mention that some vehicles have engines designed to be compact, with some components having a double role and that requires that the disassembly and reassembly be done only by following a particular order of actions.
So, break out your smartphone or other video camera... mount it where you need it for each disassembly area and start recording. Or have a helper video you disassembling each of the subgroups that you would find beneficial for reassembly.
4. Not taking the time to properly clean all parts that will be re-used.
Ever wiped your car off for dust and noticed that instead of a shiny and clean finish you ended up with a load of small scratches?
Didn't that just ruin your day and make you regret not taking an extra 10 minutes to wash it before?
That's exactly how you could end up feeling after doing a big, costly and time consuming engine rebuild if you don't sweat the details.
Mixing together new, clean components with older ones that are not cleaned could potentially ruin your new components or provoke premature wear that will significantly reduce the overall lifespan of your engine, practically voiding the whole reason behind rebuilding your engine.
Other reasons why you would want to properly clean parts that you will re-use is that they will be easier to reinstall. Being clean, they can slide back to their place with ease. Also cleaning parts thoroughly helps you identify any signs of abnormal wear or cracks that could lead to future issues with your engine. Speaking of abnormal wear, let's take a closer dive into this subject.
Abnormal wear
Could also indicate issues with other related components thus helping you identify an older problem before putting the engine back together.
Some components come with little holes that are designed for a fluid to pass through them for either lubrication or cooling purposes. These are also important to clean and ensure none are plugged as it could affect engine performance.
When cleaning, you will probably encounter components that can be easily cleaned using non-aggressive methods as well as ones that will require power tools or a machining process to properly clean.
Make sure you prepare yourself with various tools to achieve your goal. The main rule of thumb in cleaning is to use materials which are softer than the base material of the area you are cleaning and start from the least aggressive method and go up depending on the results of the cleaning.
Be sure to gently clean all parts so that you don't destroy the integrity of the components. Some components work with tight tolerance levels and cleaning them with sanding paper for example might get them looking good, however this maneuver can affect the required clearances and could create issues with how the component performs.
A pro tip after cleaning the components decently (and depending on what you're cleaning) is to bake them in an oven at 325 degrees for a few hours. It's best to bake in an oven you use for powder coating. If not, worst case scenario, you could even use a regular oven like the one in your kitchen.
Notice how we said like the one in your kitchen. Not recommended to use your everyday kitchen oven for this task. You could create some unwanted odors in your house and a sort of perma motor oil smell in your oven. This procedure will dry the remaining oil on the component and make it easier to have it cleaned off mechanically with a wire wheel or inside a bead blast cabinet or in a vibratory cleaner.
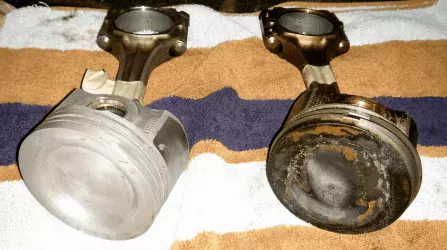
Clean Piston vs Dirty Piston
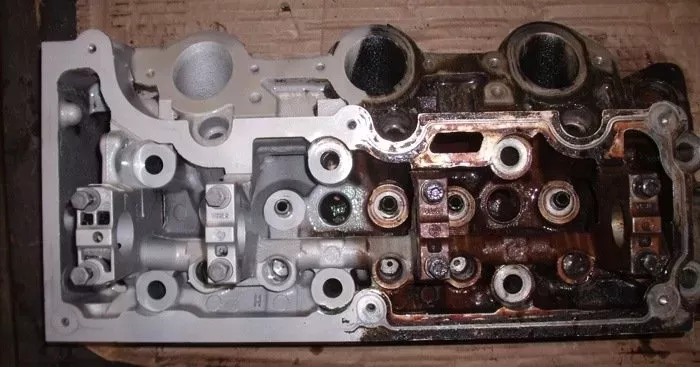
Clean Engine Head
Fasteners, such as head bolts, main and rod bearing cap bolts, etc can stretch over time or with re-use. It's best to replace those critical bolts as you rebuild if you question them at all.
Other fasteners should at least be thoroughly cleaned and inspected before reuse. Replace any questionable fasteners including those with shoulders or pivots. Threads should be clean and dry before installation, especially ones that require a specific torque setting upon tightening.

Types of engine fasteners
6. Not taking your time and double checking everything as you go back together.
As anyone who did an engine rebuild probably told you, it's best to write down step by step or video the disassembly of the engine so that when you put it back together you know what to start with and order in which the components go back together.
After investing all the time, effort and money into cleaning or replacing components, rebuilding some parts, replacing gaskets and seals, etc., you would want to be patient and make sure everything is in proper order each step of the way. Reasons are a dozen ranging from loss of time fixing your mistakes or even extra expense of having to replace items damaged (gaskets, seals) during reassembly due to the wrong sequence.
Below are the key pain points you need to be extra careful with when you do an engine rebuild:
Inserting the crankshaft in the crankcase:
The crankcase has to stay firmly in place when undergoing this operation. Preferably use a specific tool.
Reason is that the crankshaft's sharp edge can knock against the gasket seal and ruin it. Or you could damage a bearing journal on your freshly reground crankshaft. Once inserted, also pay attention to put grease between the 2 sealing lips of the gasket seal and some oil on the main bearings so they do not run dry. Always best to follow the procedure of checking bearing clearances before final assembly.
Joining the crankcases:
On some applications, you will be splitting a crankcase apart and then rejoining them. When joining the two, spread red sealer with the fingers on the crankcase side without rods. Join them together making sure everything is aligned and then add in the locking bolts but only tighten slowly to let out the excess sealer. For the final tightening, use a torque wrench and (especially important) a criss-cross pattern starting from the internal fasteners, followed by the external ones. At the end, ensure that the crankshaft turns freely.
Timing of the engine:
Very important to double check when adjusting and make sure all is in order before considering moving to the next step. Proper timing adjustment has to include :
- the counter-shaft weight positioned at the bottom
- connecting rod at Top Dead Center (maximum height of the piston in the cylinder)
- gear wheel mounted on the shaft with the mark aligned to the marks on the shaft and balancing shaft gear wheel aligned
Following these steps ensure that you have the correct timing, At the end, ensure that you tighten the nuts using a torque wrench.
Piston and cylinder reassembly:
Done improperly can lead to abnormal wear or even low compression levels. For a perfect installation, use a ring compressor with the rings properly sequenced and with the ring end gaps aligned per specs. Here is where taking a little extra time will ensure things go well. Finally, use oil for insertion to the cylinder. Failing to lubricate will result in premature wear at start-up and will also make installation more difficult and prone to a broken piston ring.

7. Having a professional machine shop do the proper machining needed and only what's needed.
Everyone dreads going to a machine shop when doing an engine rebuild as they fear their budget will be blown. Starting off the machining phase with this mindset can do more harm than good. This is not the place to cut back on as it can severely reduce or impede your final build result.
A professional machine shop is almost a necessity for an engine rebuild as it can help navigate through the myriad of details, issues and problematic areas that arise when you undertake such a complex task.
Also they help get a more pragmatic view and draw out the dots that connects the needs and capabilities with the wants. Most projects usually either lack capability due to technical or budget limitations of the engine block, crankshaft and heads or simply the desired output is just not possible without blowing up the engine. Knowing what you want to use the engine for, how much power it should have and what budget you have available goes a long way with your machine shop.
Don't make the mistake...
of not asking enough questions from your professional machine shop. Even if you're not very familiar with all of the terms and logic. It would be best to do a minimum of research at least in order to better communicate with your machinist. The bare minimum questions should include questions related to what engine builds they normally perform and if they are familiar with the particular engine you are working with as tolerances and specs are very important. Take a peek into the shop to ensure that they work organized and clean fashion. This will help ease your mind of having unnecessary delays. Always ask how backed up they are with their current work load.
Professional machine shops should provide you with expertise and since an engine rebuild is a complex task, one should make a list of elements they think are needed for proper machining and consult the professionals to ensure nothing vital is forgotten.
Finally, patience is your friend. Having the necessary patience to perform all of your own research, disassembly, cleaning, machining, parts replacement, reassembly and taking the time to double check your work, will go a long way to a successful engine rebuild.

About the Author
Tech Guy
Automotive enthusiast, passionate about Jeeps, hot-rods, turbos, performance, efficiency, diesels, fuels, high performance oils, additives and anything with an engine.
